[et_pb_section fb_built=”1″ _builder_version=”4.16″ _module_preset=”default” custom_padding=”0px||0px|||” global_colors_info=”{}”][et_pb_row _builder_version=”4.16″ _module_preset=”default” background_color=”rgba(214,154,154,0.34)” background_image=”http://ecoreprap.com/wp-content/uploads/2021/03/3D-Printer-Layer-Separation.jpg” custom_margin=”-56px|auto||auto||” custom_padding=”42px||180px|||” global_colors_info=”{}”][et_pb_column type=”4_4″ _builder_version=”4.16″ _module_preset=”default” global_colors_info=”{}”][et_pb_post_title categories=”off” comments=”off” featured_image=”off” _builder_version=”4.17.4″ _module_preset=”default” title_font=”|700|||||||” title_text_align=”center” title_text_color=”#FFFFFF” title_font_size=”42px” meta_font=”||||||||” meta_text_align=”center” meta_text_color=”#FFFFFF” meta_font_size=”17px” background_color=”rgba(0,0,0,0.27)” custom_margin=”110px||||false|false” custom_padding=”25px||25px||false|false” global_colors_info=”{}”][/et_pb_post_title][/et_pb_column][/et_pb_row][/et_pb_section][et_pb_section fb_built=”1″ _builder_version=”4.16″ _module_preset=”default” custom_padding=”0px||35px|||” global_colors_info=”{}”][et_pb_row column_structure=”2_3,1_3″ _builder_version=”4.16″ _module_preset=”default” global_colors_info=”{}”][et_pb_column type=”2_3″ _builder_version=”4.16″ _module_preset=”default” custom_padding=”|5px||5px|false|false” global_colors_info=”{}”][et_pb_text _builder_version=”4.17.4″ _module_preset=”default” text_font=”||||||||” text_text_color=”#292929″ text_font_size=”17px” custom_margin=”15px||-11px|||” global_colors_info=”{}”]
Among in 3d printing troubleshoot, layer separation could be one of the most disastrous. Not only does a print with separated layers look terrible, but it also has virtually no mechanical strength.
It’s also irreversible – by the time you see layers splitting in your project, you will likely have to start over.
[/et_pb_text][et_pb_text _builder_version=”4.17.4″ _module_preset=”default” header_2_font=”|700|||||||” header_2_text_color=”#292929″ custom_margin=”13px||9px|||” custom_padding=”15px||||false|false” global_colors_info=”{}”]
Contents(show)
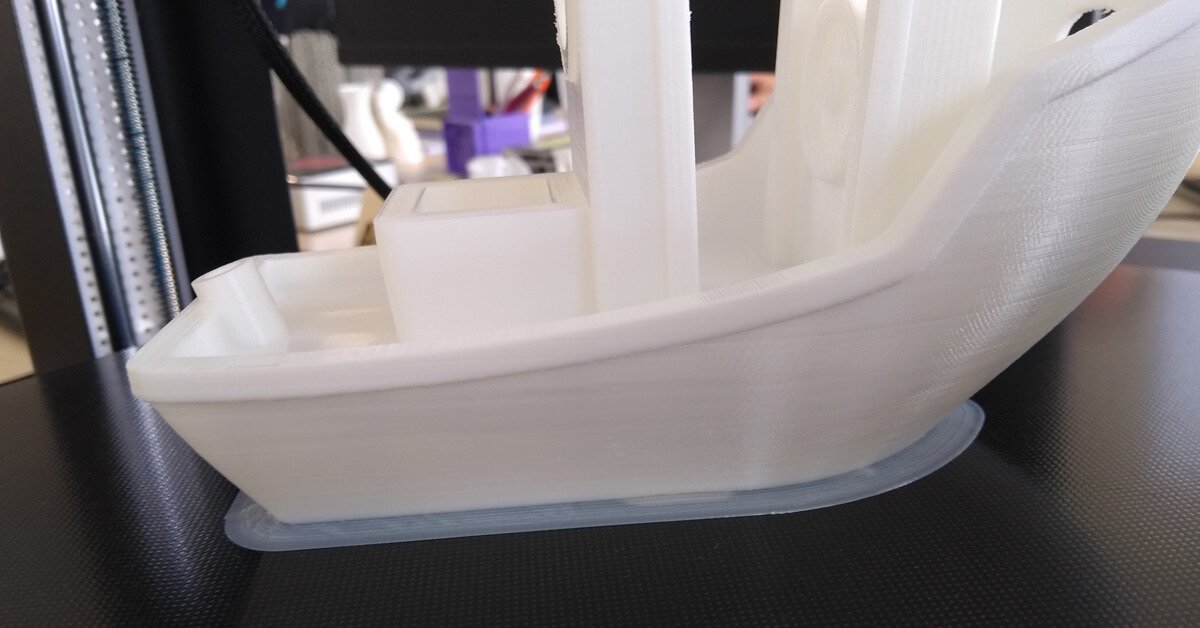
What Is Print Layer Separation?
[/et_pb_text][et_pb_image src=”http://ecoreprap.com/wp-content/uploads/2021/03/splitting_and_cracking.jpg” alt=”splitting_and_cracking” title_text=”splitting_and_cracking” align=”center” _builder_version=”4.16″ _module_preset=”default” module_alignment=”center” custom_margin=”28px||30px|||” global_colors_info=”{}”][/et_pb_image][et_pb_text _builder_version=”4.17.4″ _module_preset=”default” text_font=”||||||||” text_text_color=”#292929″ text_font_size=”17px” global_colors_info=”{}”]
Layer separation also called layer splitting or layer delamination is caused by the filament material layer’s inability to bond between layers.
Without anything to latch on to, the material expands as it cools, creating the characteristic appearance of the layer warping upward.
[/et_pb_text][et_pb_text _builder_version=”4.17.4″ _module_preset=”default” header_2_font=”|700|||||||” header_2_text_color=”#292929″ custom_margin=”-16px||9px|||” custom_padding=”8px||||false|false” global_colors_info=”{}”]
Reasons for 3D Printing Layer Separation
[/et_pb_text][et_pb_text _builder_version=”4.16″ _module_preset=”default” text_font=”Lato||||||||” text_text_color=”#292929″ text_font_size=”17px” custom_margin=”||16px|||” global_colors_info=”{}”]
About print separate, there are so many factors that could lead to this problem. such as software setting(cure), types of filament, and printing preparation.
It is not the problem with 3d printer, you don’t need to upgrade special hardware for your printer.
[/et_pb_text][et_pb_text _builder_version=”4.17.4″ _module_preset=”default” header_2_font=”Roboto Slab||||||||” header_2_text_color=”#0c71c3″ header_3_font=”|700|||||||” header_3_text_color=”#292929″ custom_margin=”-4px||13px|||” custom_padding=”8px||||false|false” global_colors_info=”{}”]
Filament Type
[/et_pb_text][et_pb_image src=”http://ecoreprap.com/wp-content/uploads/2021/03/3d-filament-type.jpg” alt=”3d filament type” title_text=”3d filament type” align=”center” _builder_version=”4.16″ _module_preset=”default” module_alignment=”center” custom_margin=”6px|||||” global_colors_info=”{}”][/et_pb_image][et_pb_text _builder_version=”4.16″ _module_preset=”default” text_font=”Lato||||||||” text_text_color=”#292929″ text_font_size=”17px” custom_margin=”||19px|||” global_colors_info=”{}”]
The melting flow rate is different among 3d printer filaments. When coming back to 3d printing, some has better adhesion of layers. ABS and Nylon are two outstanding examples.
If you’re having delamination between layers with ABS or other material which needs high print temperature, switching over to something like PLA or PETG might be the easiest solution.
[/et_pb_text][et_pb_text _builder_version=”4.16″ _module_preset=”default” header_2_font=”Roboto Slab||||||||” header_2_text_color=”#0c71c3″ header_3_font=”|700|||||||” header_3_text_color=”#292929″ custom_margin=”-4px||13px|||” custom_padding=”8px||||false|false” global_colors_info=”{}”]
Nozzle is not Clean
[/et_pb_text][et_pb_text _builder_version=”4.16″ _module_preset=”default” text_font=”Lato||||||||” text_text_color=”#292929″ text_font_size=”17px” custom_margin=”||19px|||” global_colors_info=”{}”]
Any residual filament, dust, or dirt in the nozzle can cause extrusion problems because of clogging.
Inconsistent extrusion can lead to poor layer adhesion and eventually, layer separation.
[/et_pb_text][et_pb_text _builder_version=”4.16″ _module_preset=”default” header_2_font=”Roboto Slab||||||||” header_2_text_color=”#0c71c3″ header_3_font=”|700|||||||” header_3_text_color=”#292929″ custom_margin=”-4px||13px|||” custom_padding=”8px||||false|false” global_colors_info=”{}”]
Improper Setting
[/et_pb_text][et_pb_text _builder_version=”4.16″ _module_preset=”default” text_font=”Lato||||||||” text_text_color=”#292929″ text_font_size=”17px” custom_margin=”||19px|||” global_colors_info=”{}”]
3D printers can be quite unforgiving when dialing in the proper settings for any given filament.
Improper printer settings can lead to delamination layers. It includes cooling fan speed, layer thickness, printing temperature, and so on.
[/et_pb_text][et_pb_text _builder_version=”4.17.4″ _module_preset=”default” header_2_font=”|700|||||||” header_2_text_color=”#292929″ custom_margin=”-16px||13px|||” custom_padding=”16px|||||” global_colors_info=”{}”]
Want to Fix Layer Separation? Try These Solutions
[/et_pb_text][et_pb_text _builder_version=”4.16″ _module_preset=”default” text_font=”Lato||||||||” text_text_color=”#292929″ text_font_size=”17px” global_colors_info=”{}”]
To develop a comprehensive solution to the layer separation problem, we must look at each possible reason and try to address it.
[/et_pb_text][et_pb_text _builder_version=”4.16″ _module_preset=”default” header_2_font=”Roboto Slab||||||||” header_2_text_color=”#0c71c3″ header_3_font=”|700|||||||” header_3_text_color=”#292929″ custom_margin=”-4px||13px|||” custom_padding=”8px||||false|false” global_colors_info=”{}”]
Reduce Layer Height
[/et_pb_text][et_pb_image src=”http://ecoreprap.com/wp-content/uploads/2021/03/layer-height.jpg” alt=”layer height for 3d printing” title_text=”layer height for 3d printing” align=”center” _builder_version=”4.16″ _module_preset=”default” module_alignment=”center” global_colors_info=”{}”][/et_pb_image][et_pb_text _builder_version=”4.16″ _module_preset=”default” text_font=”Lato||||||||” text_text_color=”#292929″ text_font_size=”17px” global_colors_info=”{}”]
When printing with an FDM printer, the rule of thumb sets the layer height at about 80% of the nozzle diameter. Any higher setting and you run the risk of layer separation.
Reducing layer height creates a “squishing” effect when the material is extruding. This action can mechanically aid layer adhesion by pushing the layers together. Adjusting the layer height settings can be one of the most straightforward fixes to layer separation.
[/et_pb_text][et_pb_text _builder_version=”4.16″ _module_preset=”default” header_2_font=”Roboto Slab||||||||” header_2_text_color=”#0c71c3″ header_3_font=”|700|||||||” header_3_text_color=”#292929″ custom_margin=”-14px||13px|||” custom_padding=”8px||||false|false” global_colors_info=”{}”]
Improve Nozzle Temperature
[/et_pb_text][et_pb_text _builder_version=”4.16″ _module_preset=”default” text_font=”Lato||||||||” text_text_color=”#292929″ text_font_size=”17px” global_colors_info=”{}”]
Plastic at a higher temperature will always bond better. You can take advantage of this behavior by increasing your nozzle temperature. If you’re having layer separation problems, try increasing the hot end temperature by 5 °C increments.
You can continue doing this as long as you’re still within the acceptable temperature range of your filament. Also, watch out for stringing or blobs – that’s a sign that your temperature is already too high. Dial down the temperature a bit and look at other possible solutions.
[/et_pb_text][et_pb_text _builder_version=”4.16″ _module_preset=”default” header_2_font=”Roboto Slab||||||||” header_2_text_color=”#0c71c3″ header_3_font=”|700|||||||” header_3_text_color=”#292929″ custom_margin=”-4px||13px|||” custom_padding=”8px||||false|false” global_colors_info=”{}”]
Slow Printing Speed
[/et_pb_text][et_pb_text _builder_version=”4.16″ _module_preset=”default” text_font=”Lato||||||||” text_text_color=”#292929″ text_font_size=”17px” global_colors_info=”{}”]
As with most 3D printing problems, taking it slow and steady is a safe approach to eliminating layer separation. In this case, you may want to reduce the speed of movement of the print head.
Try to reduce your print head movement speed by increments of 10 mm/sec until you can see a marked improvement. Ensures that enough filament extrudes out as the print head moves. It also gives the filament enough time to create strong bonds with the previous layer as it cools down.
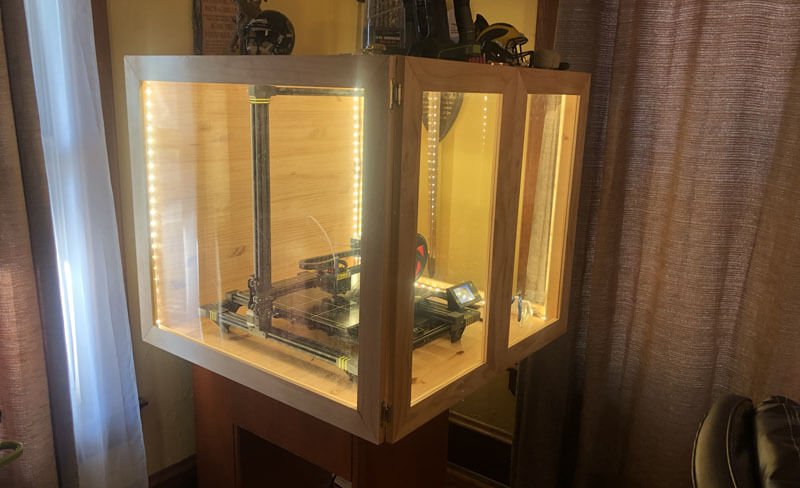
[/et_pb_text][et_pb_text _builder_version=”4.16″ _module_preset=”default” header_2_font=”Roboto Slab||||||||” header_2_text_color=”#0c71c3″ header_3_font=”|700|||||||” header_3_text_color=”#292929″ custom_margin=”-4px||13px|||” custom_padding=”8px||||false|false” global_colors_info=”{}”]
Print In Enclosure
[/et_pb_text][et_pb_image src=”http://ecoreprap.com/wp-content/uploads/2021/03/Enclosure.jpg” alt=”Enclosure” title_text=”Enclosure” align=”center” _builder_version=”4.16″ _module_preset=”default” module_alignment=”center” global_colors_info=”{}”][/et_pb_image][et_pb_text _builder_version=”4.16″ _module_preset=”default” text_font=”Lato||||||||” text_text_color=”#292929″ text_font_size=”17px” custom_margin=”||19px|||” global_colors_info=”{}”]
One of the most reliable ways to avoid layer separation is to slow down the filament’s cooling.
Allows the material to maintain high temperatures longer, thus bonding better with the preceding layer. It also redistributes thermal stress in the material to avoid the usual warping issues.
A great way to slow down cooling is to print in an enclosure. It can maintain an elevated temperature in the printing chamber and prevents heat loss to the surroundings of the 3D printer. This way is advantageous if you’re printing in a room with an open window and periodic gusts of wind.
If your 3D print does not come with a built-in enclosure, you can buy a third-party product. You can even DIY a 3D printer enclosure using inexpensive materials. Just make sure not to use materials that can melt or catch fire easily.
[/et_pb_text][et_pb_text _builder_version=”4.17.4″ _module_preset=”default” header_2_font=”Lato||||||||” header_2_text_color=”#292929″ header_3_font=”|700|||||||” header_3_text_color=”#141414″ header_3_font_size=”25px” custom_margin=”-4px||13px|||” custom_padding=”8px||||false|false” global_colors_info=”{}”]
Check Clogged Nozzle
[/et_pb_text][et_pb_image src=”http://ecoreprap.com/wp-content/uploads/2021/03/nozle-for-3d-printer.jpg” alt=”nozzle for 3d printer” title_text=”nozzle for 3d printer” align=”center” _builder_version=”4.16″ _module_preset=”default” module_alignment=”center” global_colors_info=”{}”][/et_pb_image][et_pb_text _builder_version=”4.19.0″ _module_preset=”default” text_font=”Lato||||||||” text_text_color=”#292929″ text_font_size=”17px” hover_enabled=”0″ global_colors_info=”{}” sticky_enabled=”0″]
The clogged nozzle will almost certainly lead to under-extrusion. The layer will have holes or gaps in them and compromising layer adhesion.
Any residual filament, dust, or grime can get burnt inside the nozzle and cause a clog. To avoid this, you can use a brush with brass or steel bristle to clean the inside of the nozzle periodically.
You can also do the “cold pull” method. Insert a piece of Nylon filament inside the nozzle, heat it, cool it down, and pull it out.
If this still doesn’t work, then you can disassemble the nozzle and soak it in acetone. While you’re at it, take the time to clean your entire extruder assembly.
[/et_pb_text][et_pb_text _builder_version=”4.16″ _module_preset=”default” header_2_font=”Roboto Slab||||||||” header_2_text_color=”#0c71c3″ header_3_font=”|700|||||||” header_3_text_color=”#292929″ custom_margin=”-4px||13px|||” custom_padding=”8px||||false|false” global_colors_info=”{}”]
Improve Print Cooling
[/et_pb_text][et_pb_text _builder_version=”4.16″ _module_preset=”default” text_font=”Lato||||||||” text_text_color=”#292929″ text_font_size=”17px” custom_margin=”||25px|||” global_colors_info=”{}”]
The cooling fan in your 3D printer is there for a reason. However, that does not mean that you need to use it all the time.
If you’re having problems with layer separation, the best course of action would be to turn your cooling fan off.
[/et_pb_text][et_pb_text _builder_version=”4.17.4″ _module_preset=”default” header_2_font=”|700|||||||” header_2_text_color=”#292929″ header_3_font=”Roboto Slab||||||||” header_3_text_color=”#141414″ header_3_font_size=”25px” custom_margin=”-4px||13px|||” global_colors_info=”{}”]
Other Tips You Need to Know
[/et_pb_text][et_pb_text _builder_version=”4.16″ _module_preset=”default” text_font=”Lato||||||||” text_text_color=”#292929″ text_font_size=”17px” global_colors_info=”{}”]
The solutions we have listed above all have to do with the actual 3D printing process. Just as crucial as dialing in the correct settings is making sure that you are working with a suitable filament.
Here are a few things to check on the raw material side of 3D printing.
[/et_pb_text][et_pb_text _builder_version=”4.16″ _module_preset=”default” header_2_font=”Roboto Slab||||||||” header_2_text_color=”#0c71c3″ header_3_font=”|700|||||||” header_3_text_color=”#292929″ custom_margin=”-4px||13px|||” custom_padding=”8px||||false|false” global_colors_info=”{}”]
Filament Quality
[/et_pb_text][et_pb_text _builder_version=”4.17.4″ _module_preset=”default” text_font=”||||||||” text_text_color=”#141414″ text_font_size=”17px” global_colors_info=”{}”]
When you work with cheap and poor-quality filament, you cannot expect it to perform just as well as those coming from reputable brands.
A common characteristic of cheap filament is that they have poor diameter consistency. It will lead to extrusion problems and inconsistent layers.
If you cannot get your layers to print perfectly, you will almost certainly have layer separation problems.
[/et_pb_text][et_pb_text _builder_version=”4.16″ _module_preset=”default” header_2_font=”Roboto Slab||||||||” header_2_text_color=”#0c71c3″ header_3_font=”|700|||||||” header_3_text_color=”#292929″ custom_margin=”-4px||13px|||” custom_padding=”8px||||false|false” global_colors_info=”{}”]
Store 3D Filament Properly
[/et_pb_text][et_pb_text _builder_version=”4.17.4″ _module_preset=”default” text_font=”||||||||” text_text_color=”#141414″ text_font_size=”17px” global_colors_info=”{}”]
It has been repeated time and time – humidity is the mortal enemy of 3D printing filaments. Filament materials are naturally hygroscopic, which means that they absorb moisture readily from the environment.
The filament that is absorbed with moisture will lead to heavy extrusion problems. Water will expand and evaporate in the hot end, resulting in layers with holes or gaps. These are weak points in layer adhesion and will eventually cause the layers to start splitting.
To make sure your filament stays in good condition, keep it in an airtight container with some desiccant. Silica gel is an inexpensive and easily accessible desiccant option. You can also consider drying your filament in an oven for 4 to 6 hours before 3D printing.
[/et_pb_text][et_pb_text _builder_version=”4.17.4″ _module_preset=”default” header_2_font=”|700|||||||” header_2_text_color=”#292929″ header_3_font=”Roboto Slab||||||||” header_3_text_color=”#141414″ header_3_font_size=”25px” custom_margin=”-4px||13px|||” global_colors_info=”{}”]
Summary
[/et_pb_text][et_pb_text _builder_version=”4.16″ _module_preset=”default” text_font=”||||||||” text_text_color=”#141414″ text_font_size=”17px” global_colors_info=”{}”]
3d printer layers separate are frustrating because there’s no way to salvage. For this reason, it’s worth the time to double-check your 3D printer and slicer settings to make sure that no layer separation takes place.
It’s also essential to use high-quality filament and kept away from moisture. This may sound like a lot of work, but it is still better than letting all the filament waste.
[/et_pb_text][/et_pb_column][et_pb_column type=”1_3″ _builder_version=”4.16″ _module_preset=”default” custom_padding=”5px|10px|5px|10px|false|false” sticky_position=”top” sticky_limit_bottom=”row” border_radii=”on|20px|20px|20px|20px” box_shadow_style=”preset1″ box_shadow_blur=”50px” box_shadow_color=”rgba(0,0,0,0.08)” global_colors_info=”{}”][et_pb_text _builder_version=”4.16″ _module_preset=”default” text_font=”Lato||||||||” text_text_color=”#292929″ text_font_size=”20px” header_3_font=”Lato|700|||||||” custom_margin=”20px||13px||false|false” global_colors_info=”{}”]
Need Any Services? Contact Us Now!
[/et_pb_text][et_pb_sidebar _builder_version=”4.16″ _module_preset=”default” body_font=”Lato||||||||” body_text_color=”#0C71C3″ body_font_size=”17px” text_orientation=”left” custom_margin=”||15px||false|false” custom_padding=”||0px||false|false” global_colors_info=”{}”][/et_pb_sidebar][dsm_contact_form_7 cf7_library=”10464″ _builder_version=”4.16″ _module_preset=”default” labels_font=”Lato||||||||” labels_text_color=”#292929″ labels_font_size=”17px” placeholder_text_color=”#292929″ placeholder_font_size=”17px” radio_checkbox_font=”Lato||||||||” radio_checkbox_text_color=”#292929″ radio_checkbox_font_size=”17px” custom_button_one=”on” button_one_text_color=”#FFFFFF” button_one_bg_color=”#0C71C3″ button_one_border_radius=”10px” button_one_font=”Lato|700|||||||” button_one_use_icon=”off” global_colors_info=”{}”][/dsm_contact_form_7][/et_pb_column][/et_pb_row][/et_pb_section]