Silk screen is one of the most common part marking methods widely used in CNC machined parts and sheet metal fabrication. Silk screen printing can add clear and durable marks such as logos, legends, codes, text and more on CNC machined parts and sheet metals.
Silk screen is suited with various metals and engineering plastics for CNC machining. And it would not change the dimensional precision of CNC machined parts. What’s more, it stands out over part marking for products with huge surfaces, making it suitable for sheet metal fabrication.
This article would provide a complete guide of silk screen printing, including what is silk screen, how does it work, and what materials can be silk screen printed etc.
Key Takeaways:
Silk screen, also known as screen printing or serigraphy, is a versatile industrial printing technique that uses a fine mesh screen combined with a stencil to transfer specialized ink onto surfaces for crisp and durable logos, labels, serial numbers, and decorative designs.
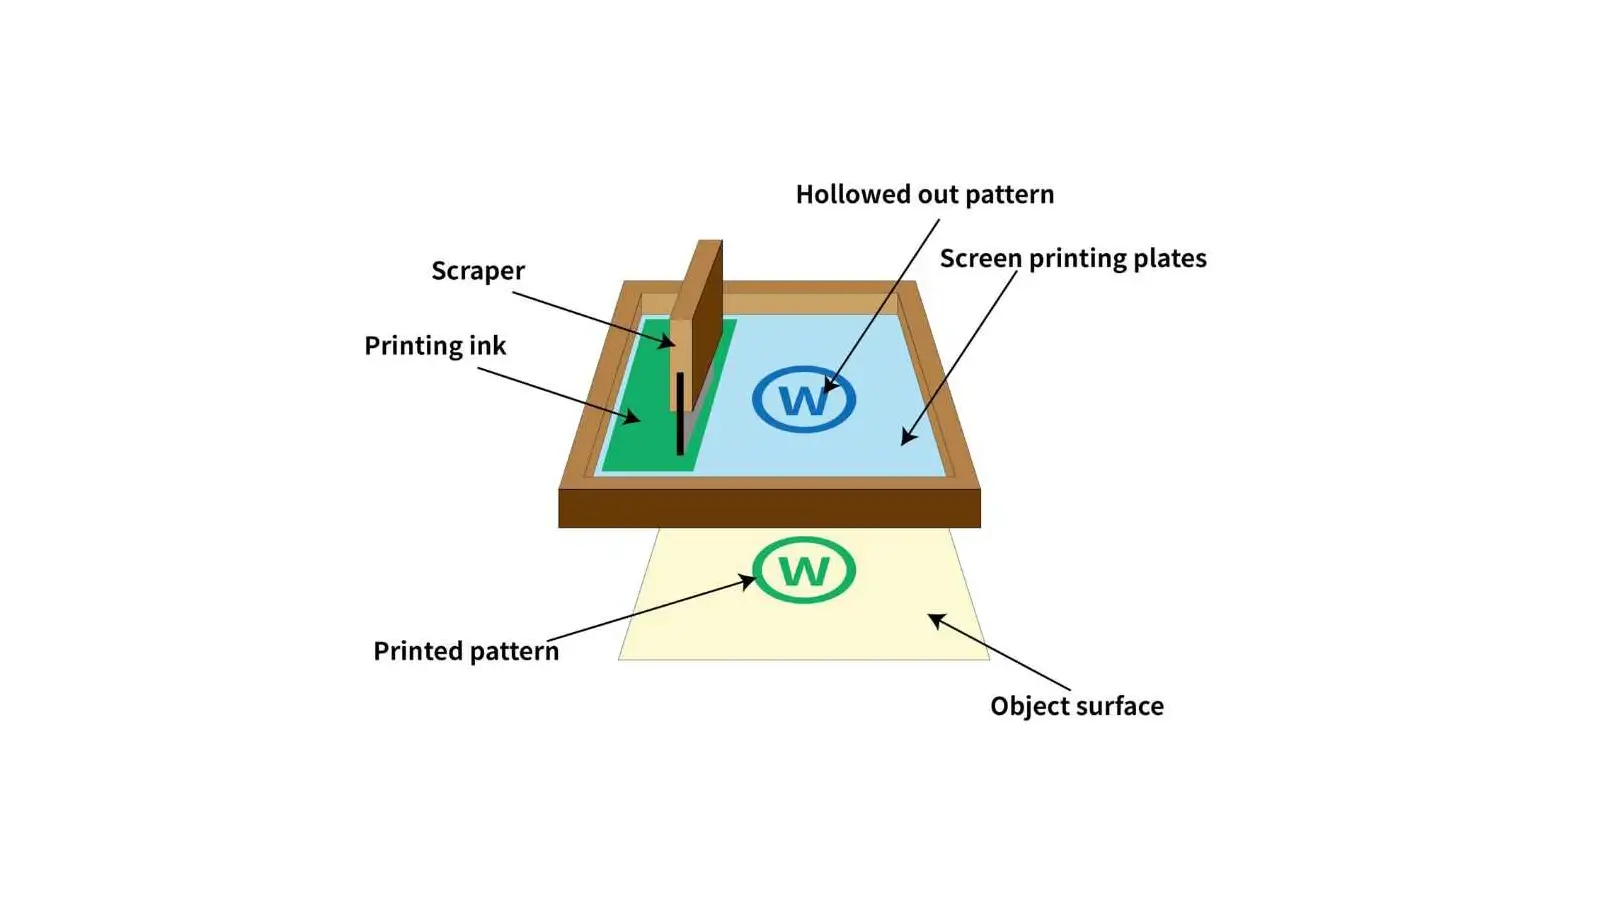
Silk screening works by pushing ink through the open areas of a stencil-mounted mesh to create bold, durable, and consistent marks that adhere tightly to substrates.
During the process, non-printing areas of the mesh are chemically or digitally blocked, while open sections allow ink to pass through. A rubber squeegee is drawn across the screen, pressing ink evenly through the mesh and onto the metal.
The printed part is then cured by heat or UV to enhance the ability to resist scratching, chemicals, moisture, and daily wear.
Traditional silk screen originally uses silk mesh while modern screen printing for CNC machined parts and sheet metals often uses synthetic mesh made of polyester or stainless steel for better durability, precision, and compatibility with industrial inks.
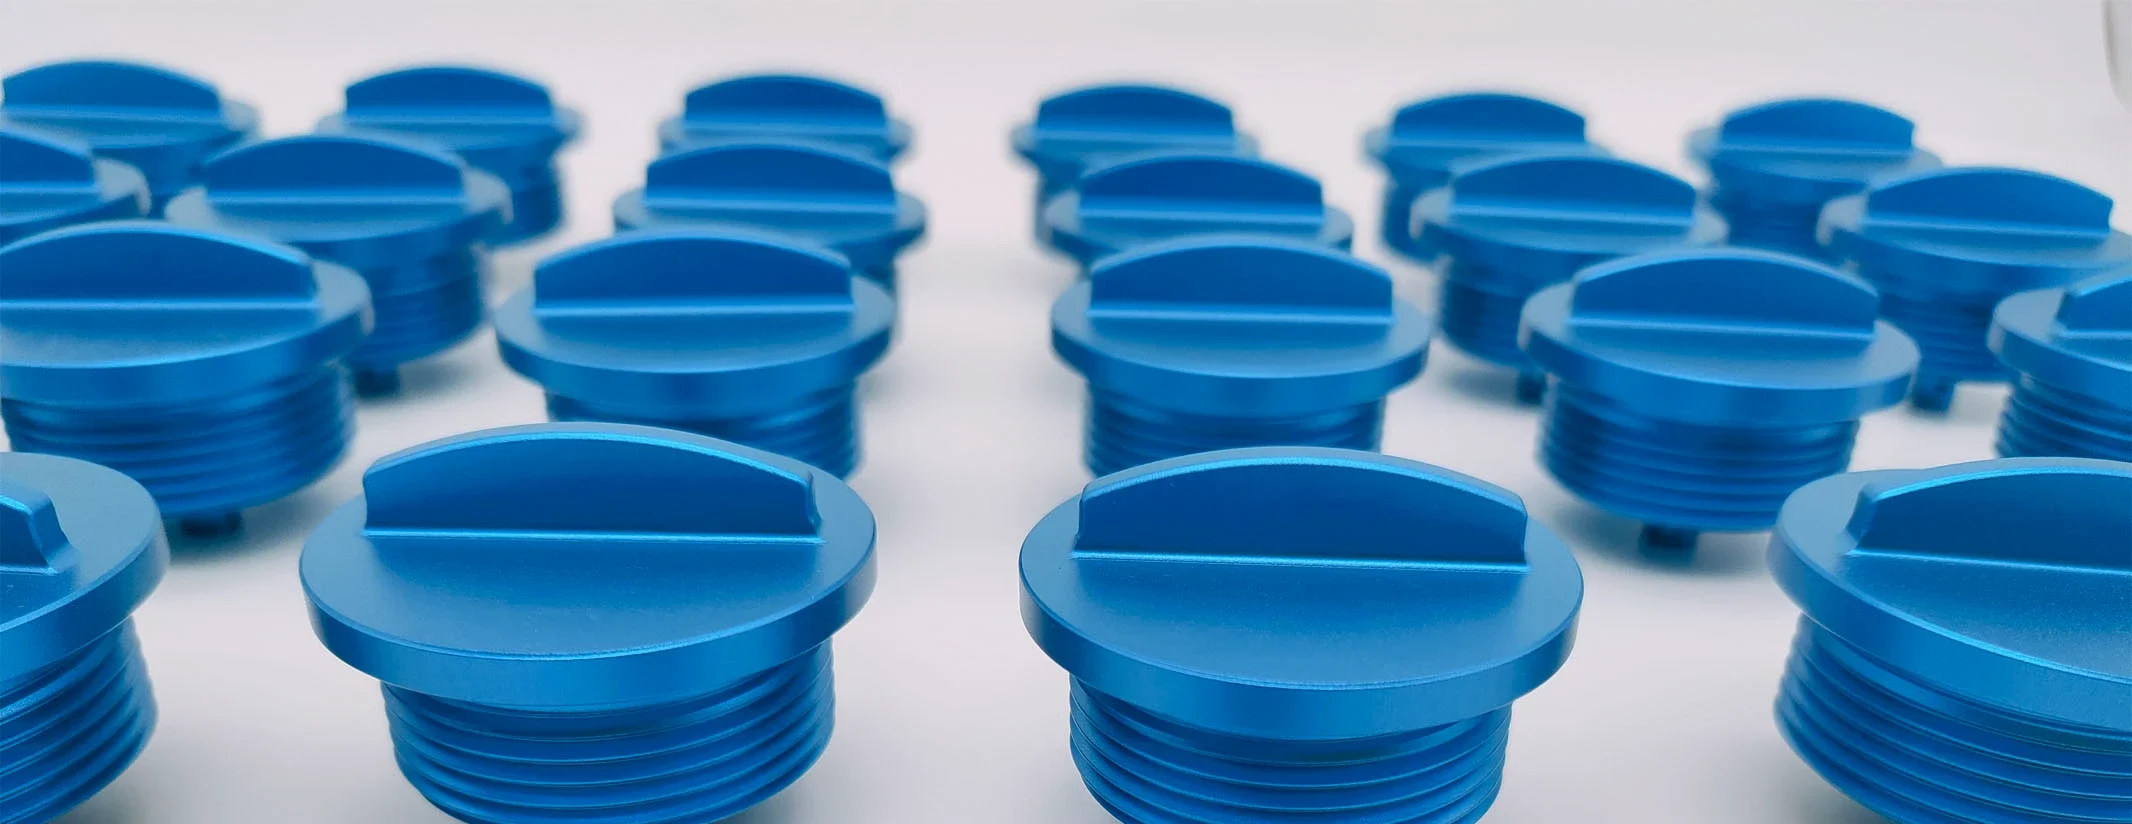
And silk screen is widely applied to CNC machined parts and sheet metals for good reason. It is suited for various materials such as stainless steel, copper, brass, aluminum, and engineering plastics that are mainly used for CNC machining.
By printing clearly and brightly colored logos, text, codes, or designs onto surfaces, silk screen offers both appealing decoration and identification for CNC machined parts and sheet metal products.
In addition, it does not affect tight tolerances or compromise surface integrity, which is important for precision and performance of CNC machined parts.
As a part marking method printing ilk on surfaces by a stenciled mesh, silk screen can be performed on various materials, including metals and engineering plastics used for CNC machining as well as fabrics, paper, glass and so on.
And note that although silk screening is suitable for various materials, its printing performance would be different based on the substrate’s features. The common materials suitable for silk screen are as follows.
Silk screening is highly effective on almost all bare or coated metals, provided the surface is clean and properly pre-treated. For coated surfaces, the ink must be must be compatible with the coating type. Solvent-based inks can damage some powder coatings if not tested first.![]()
Below are certain common metals for silk screen.
Aluminum: Aluminum parts printed by silk screen are usually used for signs, nameplates, water bottles, and promotional items. Silk screen printing on aluminum is lightweight, durable, and suitable for outdoor use. And anodized aluminum prints better.
Stainless steel: Silk screening marks can stay well on stainless-steel surfaces. They are great for harsh environments. And it often requires special epoxy inks and sometimes a primer.
Brass and Copper: They are usually used for decorative items, jewelry, and custom plaques. Silk screen printing adds intricate designs to these metals without damaging their finish. And clear coating is recommended.
Fabrics are the most popular materials for silk screen printing, used widely in apparel, home decor, and textile industries. Silk screen printing works well with both natural and synthetic fabrics.
It offers bold and long-lasting colors that resist fading even after multiple washes. Common fabric substrates include:
Cotton: This material can absorb and hold ink well. Silk-screened cotton is widely used for t-shirts, hoodies, tote bags, and towels. It is affordable and easy to print on.
Polyester: It is s kind of synthetic fabric that requires special ink to ensure good adhesion. The silk screen marks on this material are typically durable and moisture-wicking, suitable for athletic wear, swimwear, and performance apparel.
Silk screen printing is a popular choice for paper and cardboard products. It can offer vibrant and opaque colors. They are commonly used for marketing materials, packaging, and crafts. Common paper/cardboard substrates include:
Cardstock: This is a type of thick and durable paper used for business cards, postcards, flyers, and invitations. Silk screen printing gives cardstock a tactile and high-quality finish.
Poster Paper: They are used for large-format prints like event posters, art prints, and signage. Silk screen printing ensures bold colors and sharp details, even on large surfaces.
Silk screen printing works well with many types of plastics and acrylics. The key is using ink formulated for plastic to ensure the design adheres properly and resists scratching. Common plastic substrates include:
Acrylic(Plexiglass): They are used for signs, displays, and decorative items. Silk screen printing on acrylic creates a sleek, professional look, often used for store signs or custom art pieces.
PVC: With durable and weather-resistant silk screen printings, they are often applied to water bottles, keychains, and pens.
ABS Plastics: They are often used for toys, electronic casings, and industrial parts. Silk screen printing allows for precise and permanent marking on these hard plastic surfaces.
Silk screen printing on glass and ceramic is popular for home decor, drinkware, and signage. It requires heat curing after printing to set the ink, ensuring it is resistant to dishwasher and fading.
There are various materials and tools needed for silk screen. To achieve high-quality and consistent prints, right tools are important. Below are the list of essential materials and tools used for silk screen.
The screen mesh is the foundation of silk screen printing. It is a porous material stretched over a frame, where the stencil is applied.
Despite its name, modern silk screen mesh is usually made of polyester or nylon. Polyester mesh is the most common type for its durability and affordability, while nylon mesh is better for fine details.
And the count of silk screen mesh (the number of threads per inch) matters much for the printing performance. Lower counts (110-160) usually work for bold designs and thick inks, while higher counts (200-305) are ideal for fine details and thin inks.
The frame holds the mesh taut to ensure that the squeegee glides smoothly and the stencil stays in place. It is typically made of aluminum or wood. The former stands out since aluminum is lightweight, durable, and reusable. And the latter is affordable for beginners but less durable long-term.
It is crucial to choose a frame size that matches the products. Small frames (12×16 inches) are often used for crafts, while larger frames (20×24 inches or more) are used for t-shirts or posters.
More importantly, make sure the frame is sturdy and the mesh is tightly stretched. Loose mesh would lead to blurry prints.
Emulsion and sensitizer are used to create the stencil for silk screen. They should be mixed as formulated and coated on the screen as designed.
Emulsion is a light-sensitive liquid that coats the screen mesh as the base to create the stencil. And sensitizer is a light-reactive additive that would harden when exposed to UV light.
There are two main types of emulsion: diazo emulsion and photopolymer emulsion. Diazo emulsion is economical and easy to use for beginners while photopolymer emulsion is faster to expose and better for fine details.
Ink is the most essential material for silk screen. It transfers the designs from the screen to the surfaces. And the material to be printed on determines the type of ink to be used. Common ink types include:
Plastisol Ink: It is the most popular ink type for fabric. Plastisol ink is typically thick and vibrant with brilliant durability for outdoor and chemical exposure. And it requires heat curing between 160°C to 180°C.
Water-based Ink: It often works for fabrics and paper for its eco-friendliness. It dries faster than plastisol and does not require heat curing (though heat helps set it better).
Solvent-based Ink: This type of ink is typically applied to non-porous materials like plastics, metals, and glasses for general industrial markings. It adheres well to smooth surfaces but requires proper ventilation since it is toxic if inhaled. It is cured usually by air dry or low heat
UV-curable Ink: It dries instantly when exposed to UV light, ideal for plastic, glass, and metal. UV-curable ink is durable and resistant to fading, making it great for industrial or outdoor prints. What’s more, it is also ideal for fast production and highly detailed printings.
Masking tape is used to cover the edges of the screen frame and then to prevent ink from leaking onto the substrate. Block-out film is a type of thick and opaque tape or liquid used to cover any small holes or gaps in the stencil to avoid blurs or ink bleeding.
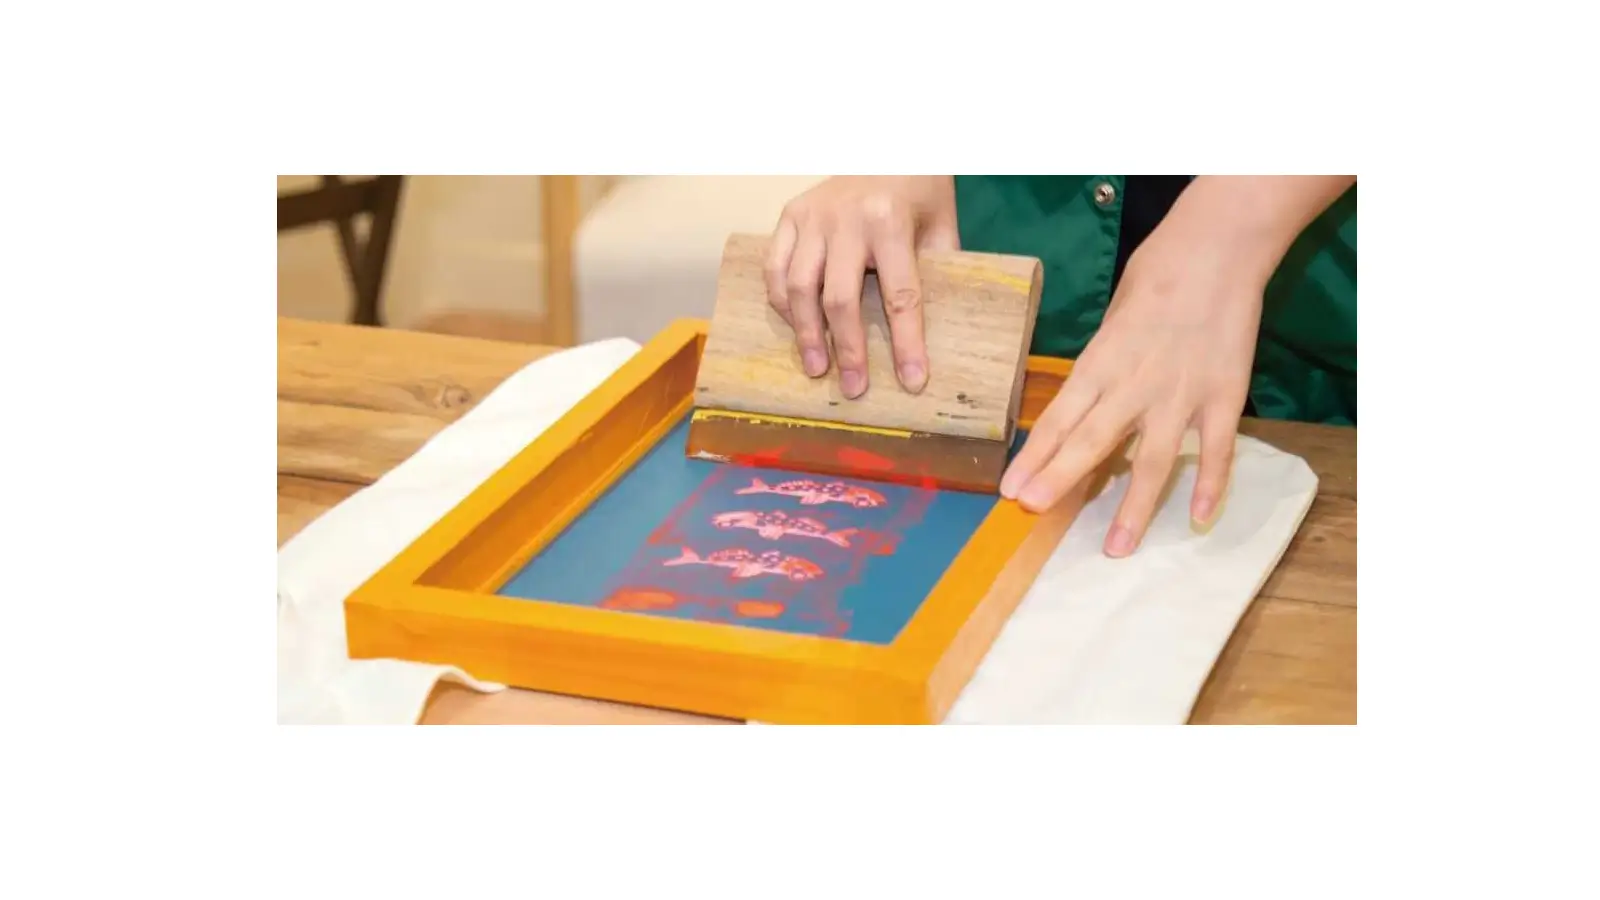
The squeegee is used to push ink through the screen mesh and onto the substrate. It has a rubber blade and a handle. And the rubber blade usually varies in hardness: soft for delicate substrates and hard for thick inks.
An exposure unit is used to harden the emulsion and sensitizer on the screen by UV light to create the stencil. Without an exposure unit, natural sunlight is also acceptable, but results are less consistent.
A transparent film is where the design should be printed on. The film should be opaque so that UV light cannot pass through the design area, which ensures the emulsion under the design stays soft and can be washed away.
After exposing the screen, it is required to wash away the unhardened emulsion (the design area) to create the stencil. A washout station, usually a small sink or basin with a spray nozzle, is needed. The operator should use cool water to gently spray the screen until the design is clear.
Cleaning supplies including screen cleaner, paper towels or rags, gloves, and ink remover are important to keep the tools and screens reusable.
To achieve durable and crisp silk screen printings, it is also critical to know about how does silk screen work on CNC machined components and sheet metals. Below is a step-by-step guide of silk screening.
The primary step of silk screen is to prepare the design for the parts. Just print the design onto clear polyester film by an imagesetter or inkjet printer with all-black ink.
The second step is to coat the screen with emulsion in a darkroom or under yellow light. The detailed steps are as follows.
After coat the screen with emulsion, it is required to expose the stencil, which transfer the design to the screen. The detailed steps are as follows.
As the performance of metal surfaces would significantly influence the printing adhesion and quality, it is essential to prepare the metal surface carefully. The detailed steps are as follows.
For Bare Metal:
For Powder-coated or Painted Metal:
After the CNC machined components or sheet metal parts are cleaned and dried properly, it is required to position they into a custom fixture. The detailed steps are as follows.
Followed after the part is mounted, the screen should be set up properly. The detailed steps are as follows.
After all the materials and settings are prepared, it is time to transfer the design to the metal components. The detailed steps are as follows.
Note: for multi-color printings, just repeat steps 5-7 for each color and cure or flash-dry between colors if required by the ink type.
Curing is also an essential step for good silk screen printing, which makes the markings durable, scratch-resistant, and resistant to chemicals. And it is required to cure the printings according to the ink type.
The final step is to clean up the screen. The detailed steps are as follows.
One of the most outstanding advantages of silk screening is that it can achieve various colors and textures for different visible effects. The ink can be specially formulated for specific colors and by mixed with certain additives, different textures can achieve.
Silk screen inks come in countless shades, but most projects rely on a core set of standard colors, specialty options, and custom blends. The choice of color often depends on the substrate, the printing purpose, and brand guidelines. Below are the most widely used options:
These colors are the foundation of silk screen. They are affordable and compatible with almost all substrates. And they deliver a bold, consistent finish, ideal for simple designs, logos, or text. The most common standard colors include:
Basic Neutrals: Black, white, and various grays like steel gray, silver gray and cool gray are timeless choices. Black works well for high-contrast designs on light substrates, while white is essential for printing on dark fabrics, acting as a base layer to make other colors pop. Off-white is also popular for a softer and more vintage look.
Primary and Secondary Hues: Red (super red, scarlet, maroon), blue (royal blue, navy, light blue), and yellow (lemon yellow, true yellow) are the primary colors, which can be mixed to create secondary colors like orange, green, and purple. These bright and vibrant shades are perfect for bold and appealing designs.
Earth Tones: Brown (dark brown, sienna brown), cream, and flesh tones are popular for designs that need a warm and natural look. They are commonly used for apparel, home decor, and designs with a vintage or organic aesthetic.
Metallic Finishes: Gold and silver are the most common metallic options, adding a luxe, reflective finish. They work well for logos, event merchandise, or designs that need a touch of elegance. Note that metallic inks may require a special base layer for optimal adhesion and shine.
Fluorescent Finishes: These bright and neon shades glow under blacklight and stand out in low-light environments. They are perfect for streetwear, concert merch, or any appealing design. Keep in mind that fluorescent inks are brighter in person than they appear on digital screens.
Glitter Finishes: Glitter inks contain tiny reflective particles that add sparkle and dimension to prints. They are available in various colors and can be used as an overlay or full design, ideal for apparel, accessories, and festive items.
Besides above standard colors and special colors, silk screen printing also allows for custom color mixing. Using the principles of subtractive color mixing, you can create unique shades tailored to your brand or design.
For precise matches, many printers use Pantone (PMS) color codes or RAL to ensure consistency across projects.
And note that screen colors may differ from actual ink colors due to monitor settings, substrate color, and ink thickness. It always requests a physical sample before finalizing large orders.
Texture adds depth and tactile interest to silk screen prints. Below are the most popular textures used in silk screen printing:
This is the most basic and common texture in silk screen printing. The ink is applied in a thin and even layer to achieve a smooth, flat finish that sits close to the substrate.
Flat texture is ideal for simple designs, text, or logos where clarity and readability are key. Smooth texture works well with standard inks on most substrates, including cotton, paper, and plastic.
And this texture is durable enough for frequent washing.
Raised or embossed texture creates a 3D effect, where the ink sits above the part’s surface. This is achieved by adding a thickening agent to the ink or using a specialty ink that expands when heated.
It is a tactile finish that can be felt by running finger over the print. It is perfect for highlighting specific design elements and adds a premium, high-end feel to apparel, packaging, and signage.
Raised texture is often used in streetwear and luxury branding due to its bold, eye-catching appearance.
Puff texture is a type of raised texture that uses puff ink, which is a specialty ink that expands when exposed to heat during the curing process.
The ink puffs up to create a soft, rounded, 3D effect that is lightweight and tactile. It is commonly used for kid’s apparel, playful designs, or any project that needs a fun, whimsical touch.
Puff texture works best on cotton fabrics and can be combined with other inks for a unique look.
Flocked texture adds a soft and velvety feel to prints. The process involves applying a layer of adhesive ink to the substrate, then sprinkling fine nylon or polyester fibers onto the wet ink.
The fibers adhere to the adhesive, creating a fuzzy and tactile finish that looks luxurious and unique. Flocked texture is often used for apparel, accessories, and home decor.
Foil texture combines the shine of metallic foil with the precision of silk screen printing. A special adhesive ink is applied to the substrate, then a metallic or holographic foil is pressed onto the adhesive by heat and pressure.
The foil adheres only to the inked areas, creating a reflective and smooth texture that is perfect for adding elegance or glamour to designs. Foil textures are popular for wedding invitations, luxury packaging, and high-end apparel logos.
Grunge and halftone textures add a vintage or edgy look to prints. Halftone uses tiny dots (of varying sizes) to create the illusion of gradient or shading, while grunge textures incorporate irregular, distressed patterns like ink smudges or rough edges.
These textures are ideal for retro designs, band merch, or artwork that needs a raw, authentic feel. They can be achieved with specialty inks or by adjusting the screen mesh size to create a more textured print surface.
Although silk screen is one of the most popular part marking methods for custom apparel, promotional items, artwork, and more benefiting from its outstanding advantages, there are also certain disadvantages making it unsuitable for some projects.
It is important to know about its pros and cons before to achieve best printing results. Below we show both its strengths and limitations.
Silk screening stands out over brilliant marking durability. The ink used in screen printing is usually thick and bonds deeply with the substrate, rather than just sitting on the surface.
This means silks screen prints can withstand frequent washing, exposure to sunlight, and regular wear and tear without fading, cracking, or peeling.
Silk screen printing offers bright and saturated colors that stand out even on dark or textured substrates. It uses opaque inks that would not get washed out by the base color of the material.
There are also various special or custom colors and different textures. This makes it perfect for bold logos, brand designs, or artwork that needs to make an impact.
While silk screen printing requires some upfront setup, it becomes cost-effective when printing large quantities of products. Setup costs are moderate, but unit costs drop dramatically as quantity increases.
This makes it ideal for businesses, events, or organizations that need 50+ custom items.
Silk screen printing works on almost any material. It can be performed on fabric, paper, plastic, wood, metal, glass, and even leather, making it widely applied to custom t-shirts, posters, water bottles, or signage.
Silk screening can deliver consistent and high-quality markings as long as the surfaces are prepared properly and the printing are done correctly.
The stencil method ensures that each print is identical to the next, which is crucial for branding or projects where uniformity matters.
Even with complex designs, as long as they are broken down into layers, screen printing maintains clarity and precision.
The biggest downside of silk screen printing is the upfront setup cost. Each color in your design requires a separate screen stencil, which takes time and money to create.
For small batches(usually less than 50 units), the setup cost can make the per-unit price very high.
Each color in the design needs its own screen and a separate printing pass through the press. This means that a design with 3+ colors will take longer to print, as each layer has to dry before the next one is applied.
For complex, multi-color designs, the process can be slow, especially compared to digital printing, which prints all colors at once.
Silk screen printing struggles with very intricate designs like tiny text and detailed patterns or designs with gradients (smooth color transitions).
Because each color is a solid layer, gradients have to be created using halftone dots (tiny dots of varying sizes).
Silk screen requires the mesh to contact the surface evenly. Therefore, it works well for flat surfaces, slightly curved surfaces, and cylindrical parts, but works poor for complex geometries such as deep recesses, sharp corners or complex 3D CNC machined shapes.
To achieve desired marking performance, there are certain common mistakes that operators should know and avoid during the silk screen printing processes.
These errors can ruin the prints, waste materials, and slow down the workflow. Operators should know how to avoid and resolve these problems.
Problem
One of the most common mistakes in silk screen printing is getting the exposure time wrong. Over-exposure would harden the emulsion too much and then make fine details impossible to wash out.
Under-exposure, on the other hand, means the emulsion is not fully hardened. It would cause the stencil to break down or wash away during printing, leading to blurry designs or ink bleeding.
Solution
To avoid wrong exposure time, operators should follow emulsion instructions carefully and test the time first. Different emulsions have different exposure requirements. Operators should always check the guidelines before.
Problem
When applying emulsion to the screen, uneven coating leads to inconsistent stencils. Thick spots may not expose properly, while thin spots can break easily during printing.
Uneven emulsion coating might be caused by uneven pressure or low-quality scoop coater. This would result in blurry prints, ink bleeding, or design missing.
Solution
To avoid this problem, operators should use a smooth and even-edged scoop coater for consistent emulsion application. And make sure to remove any rubber edge protectors before use.
In addition, note to coat emulsion slowly and evenly by holding the coater at 45℃ to the screen with gentle and consistent pressure. And coat both sides of the screen.
Problem
Mesh count determines how much ink passes through the screen and how sharp your design will be. Using a low mesh count for fine designs causes ink to bleed, while a high mesh count for thick ink leads to clogged screens and incomplete prints.
Solution
First of all, it is crucial to match mesh count to the design. Use a high mesh count (200-300) for fine details, small text, or thin ink. And use a low mesh count (110-160) for thick ink, bold designs, or large areas of color.
Secondly, consider the substrate. For thick substrates like canvas, a lower mesh count can allow more ink to pass through. For thin substrates like paper, a higher mesh count works better.
Finally, test before printing. It is always recommended to test the mesh count with a small section of the design to ensure the ink flows smoothly and details stay sharp.
Problem
Ink bleeding occurs when ink spreads outside the stencil lines, which would create blurry and fuzzy edges. Common causes include over-loading or over-thin ink, incorrect off-contact distance, and unstable substrates.
Solution
Firstly, control ink amount. Use only enough ink to cover the stencil. A small bead of ink along the top of the screen is enough in general.
Secondly, adjust ink viscosity according to the guidelines. If it is too thin, add certain thickener while if too thick, add a proper amount of reducer.
Thirdly, for off-contact distance, set the screen slightly above the substrate about 1.5-3 mm. This ensures the screen only touches the substrate during the print stroke, preventing ink from being pushed too far.
Finally, secure the substrate by a tape or clamps to hold it well in place.
In conclusion, silk screen is a popular part marking method widely used in CNC machined components, sheet metals, and other industrial or daily applications.
It prints designed logos, codes, images, text, and so on by transferring specific ink from a stencil onto the substrate, providing vibrant colors, durable finishes and consistent markings.
Additionally, silk screening is versatile on printing material. It works well on various substrates such as fabrics, metals, plastics, papers, and more. And for high volume of flat or large surfaces, it is a cost-effective choice.
Yes, silk screen printings can be removed by heat and scraping. Chemical solvents or certain abrasive tools can also be used to removed silkscreen.
In general, the printing time ranges from 1 day to 2 weeks. It depends on color layer, batch, and design complexity.
Laser engraving is commonly used on CNC machined parts when permanent marking is required.
Its biggest advantage is durability, because the mark will not easily fade, peel, or wear away over time. It is ideal for serial numbers, QR codes, logos, part numbers, and traceability markings.
Laser engraving also offers very high precision, making it suitable for small text and detailed graphics on materials such as aluminum, stainless steel, plastics, and anodized surfaces.
However, laser engraving is usually limited to monochrome marking and may not be suitable for colorful decorative designs or large filled graphics.
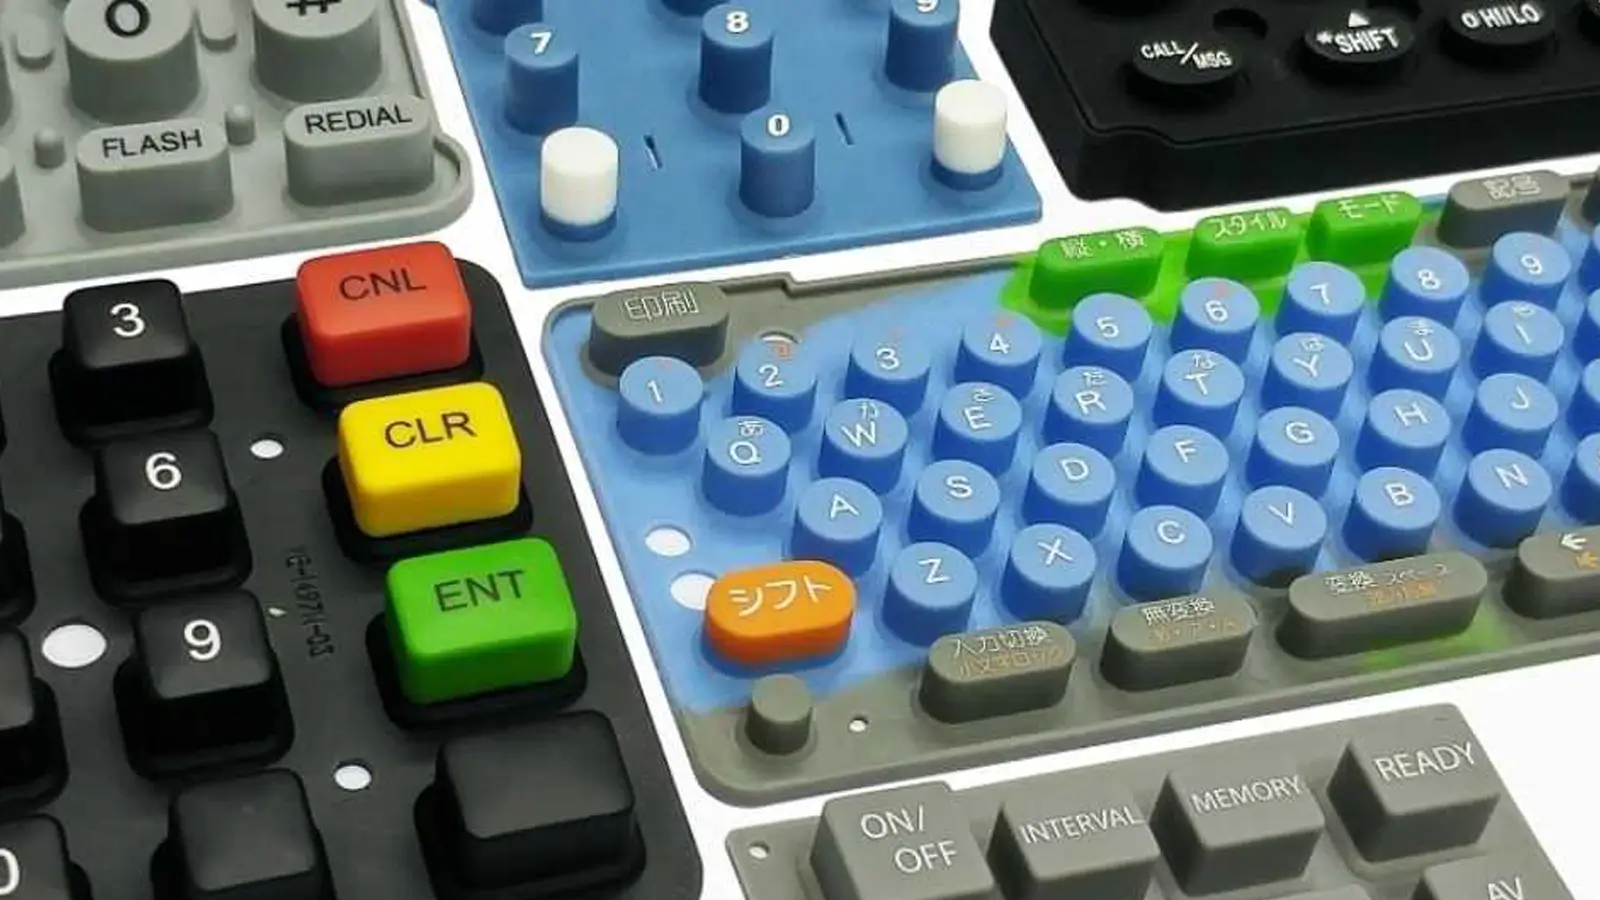
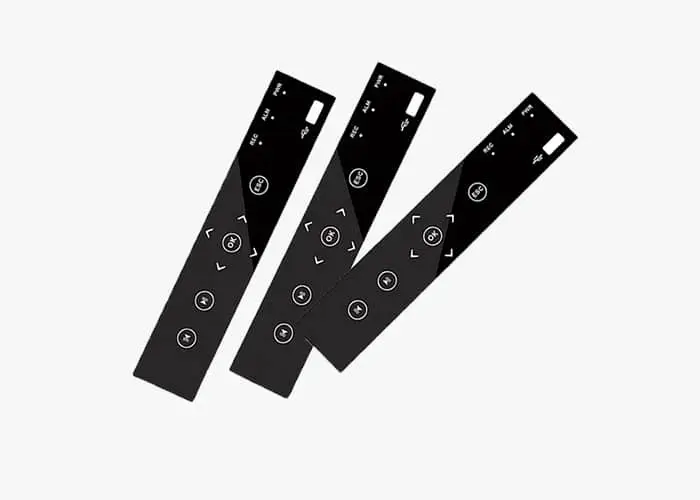
Silk screen printing is often chosen when CNC machined parts need colorful logos, icons, branding, or decorative graphics.
It is especially suitable for control panels, front panels, consumer products, and housings where visual appearance is important.
Silk screen printing can produce vibrant colors and is often more cost-effective for high-volume production after the screen has been prepared.
However, compared with laser engraving, silk screen printing is less durable because the ink may scratch, fade, chip, or peel over time, especially in harsh environments or on frequently handled parts.
In general, laser engraving is better for permanent, precise, and wear-resistant marking, while silk screen printing is better for colorful, decorative, and large-volume applications.

5-Axis CNC machining is a manufacturing process that uses computer numerical control systems to operate 5-axis CNC machines capable of moving a cutting tool or a workpiece along five distinct axes simultaneously.

China is the best country for CNC machining service considering cost, precision, logistic and other factors. Statistical data suggests that China emerges as the premier destination for CNC machining.

Selecting the right prototype manufacturing supplier in China is a critical decision that can significantly impact the success of your product development project.

Machining tolerances stand for the precision of manufacturing processes and products. The lower the values of machining tolerances are, the higher the accuracy level would be.